01
Mix the liquid ingredients
Put the sugar, salt, slightly cooled melted butter, yeast, egg and milk in a bowl. Whisk everything together well.
Tip: The melted butter should be lukewarm, not hot, so it does not affect the yeast.
Lievitatini
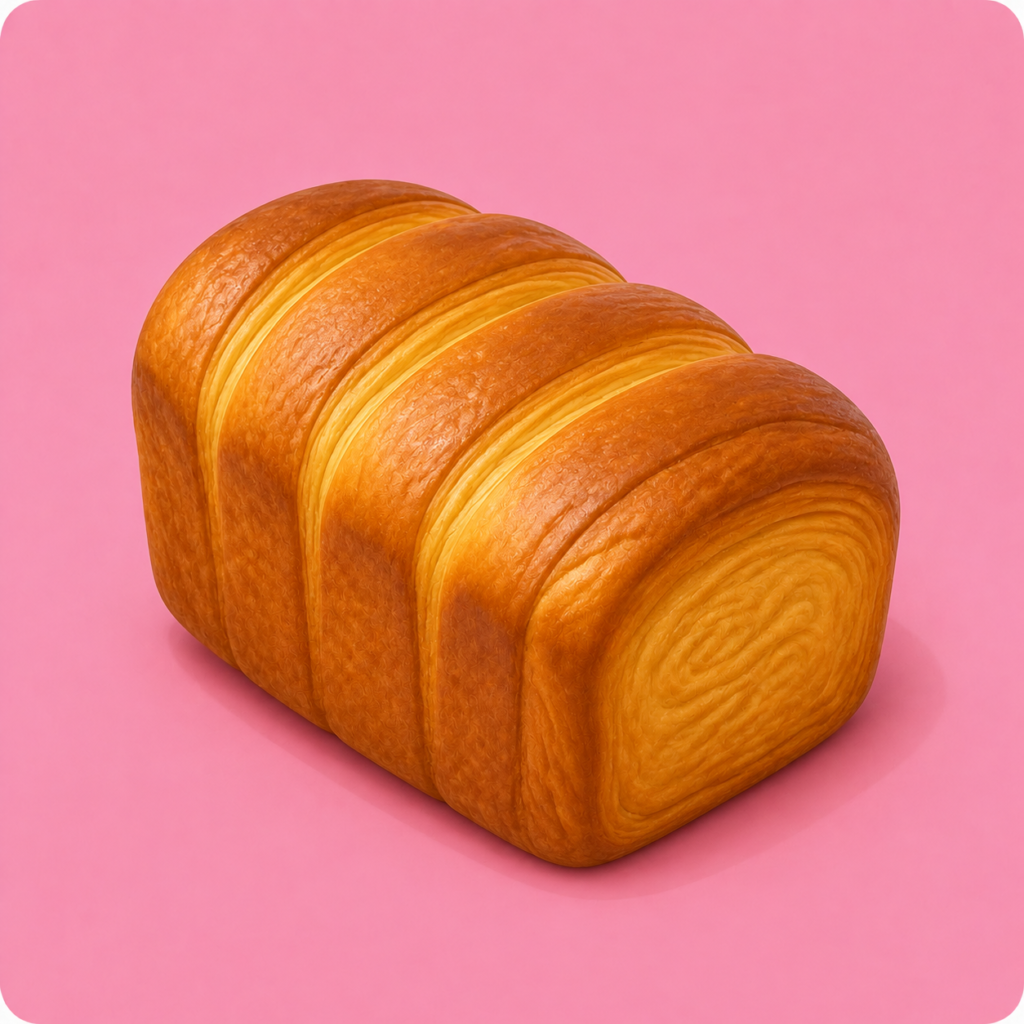
Put the sugar, salt, slightly cooled melted butter, yeast, egg and milk in a bowl. Whisk everything together well.
Tip: The melted butter should be lukewarm, not hot, so it does not affect the yeast.
Add the flour and mix with a spatula until no dry flour is left. Once the flour is fully incorporated, knead the dough by hand for 5 minutes.
Tip: At this stage an even dough is enough: the structure develops with the next round of kneading.
Wrap the dough well in cling film and let it rest in the fridge for 30 minutes.
Tip: The film should cling tightly so the surface of the dough does not dry out.
Take the dough out of the fridge and knead it by hand for another 7 minutes.
Tip: By the end, the dough should look smoother and more elastic.
Wrap the dough again and put it back in the fridge for 15 minutes.
Tip: This short rest makes the dough easier to roll out.
Put the dough between two sheets of baking paper or in a clear bag. Roll it out with a rolling pin into an even shape, as square as possible.
Tip: Getting the shape right now makes it easier to enclose the butter the next day.
Let the well-covered dough rest in the fridge overnight.
Tip: Lay it on a flat surface so it keeps an even shape.
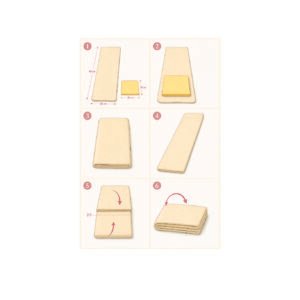
Place 125 g of unsalted butter between two sheets of baking paper or in a bag. Roll it out with a rolling pin into an even 16 × 20 cm rectangle, just like when making croissants.
Tip: The butter should be cold but pliable: it must not crack or be too soft.
Take the dough out of the fridge and roll it into a rectangle exactly twice as long as the butter sheet. Place the butter on the dough, fold it over completely and gently seal the ends.
Tip: Do not leave any gaps where the butter could escape while rolling.
Gently roll the package out with a rolling pin, keeping it rectangular. Aim for a thickness of about 1 cm, or 5 mm if you are more experienced.
Tip: Work from the centre towards the ends without squashing the butter too much.
Fold one end of the dough in by about two thirds. Fold the other end over until the two edges meet exactly, then fold everything in half again as if you were closing a book.
Tip: The two ends should meet before the final fold without overlapping.
Cover the dough and let it rest in the fridge for 30 minutes.
Tip: Resting keeps the butter cold and relaxes the dough before the second fold.
Roll the dough out into a rectangle again. Repeat the same book fold: bring one end two thirds of the way to the centre, bring the other end to meet it and fold everything in half.
Tip: If the butter starts to soften, put the dough straight back in the fridge.
Cover the dough and let it rest in the fridge again for 30 minutes.
Tip: Do not cut this rest short: it is important to keep the butter layers separate.
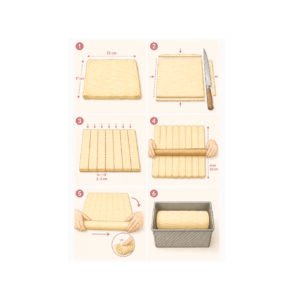
Take the dough and carefully roll it out into a rectangle of about 22 × 17 cm. Move it to a tray, cover it with cling film and let it rest in the fridge for 10 minutes.
Tip: Measure the rectangle before resting so you get eight strips that are as even as possible.
Trim the uneven ends with a sharp knife to get a perfect rectangle. Then cut the dough into 8 equal strips, about 2–3 cm apart.
Tip: Make clean cuts without dragging the knife, so the layers stay clearly visible.
Turn the 8 strips so the butter layers are visible and arrange them all vertically, side by side. Push them close together and press gently with your hands so they stick to each other and form a single block.
Tip: The strips must stay together: do not work or roll them one by one.
Run the rolling pin over all 8 strips side by side and roll them out together as a single sheet. Stretch the block evenly to a maximum length of about 20 cm.
Tip: The rolling pin should work on all the strips at once, keeping them parallel and joined.
Flip the whole sheet over, keeping the 8 strips together. Roll it up tightly from one end into a single large roll.
Tip: Gently press the final edge so it sticks and seals the roll for good.
Put the roll in the Shokupan tin with the seam facing down. Cover the tin with its lid or with cling film.
Tip: Place the roll in the middle of the tin so it rises evenly.
Put the tin in the switched-off oven together with a bowl of hot water. Let it rise for about 4 hours.
Tip: The oven must stay off: the hot water is only there to create a warm, humid environment.
Gently brush the top of the dough with a little milk. Bake in an oven preheated to 190 °C for 23 minutes.
Tip: Brush without pressing so you do not deflate the risen dough.
After 23 minutes, cover the bread with a sheet of foil and keep baking, still at 190 °C, for another 7 minutes.
Tip: The foil stops the top from getting too dark in the last few minutes.
As soon as it comes out of the oven, tap the tin firmly on the counter and take the bread out straight away. Let it cool completely on a wire rack before slicing and eating.
Tip: Do not let the bread cool in the tin, or the moisture will make the base soggy.
Sofi’s tips